Uncategorized
How to Replace Pins and Tubes on Omega Seamaster Watch Links (with Step-by-Step Guide)

Jul
Learning how to replace pins and tubes on Omega Seamaster watch links is easier than it sounds. Omega Seamaster bracelets are built to last, but over time they can develop stretch due to worn internal parts. In other cases, your bracelet may feel too tight and you need to insert a new link for a better fit.
This guide shows you how to remove and reinsert the pin and two-tube assembly used in many Omega Seamaster links. Whether you’re replacing worn parts to fix stretch or adding a link, the steps are the same. By the end, you’ll know exactly how to replace pins and tubes on Omega Seamaster watch links using tools you may already own.
What You’ll Need
- Spare pin and tube set (see below for compatible models)
- Watch pin removal tool (metal is better than plastic)
- Pliers
- Small hammer or mallet
Compatible Parts for Omega Seamaster Bracelets
We supply high-quality, compatible pins and tubes for full-sized and mid-sized Seamaster bracelets. These are precision-made and built to last.
For Full-Sized Omega Seamaster Bracelet Links
Fits bracelets stamped:
-
1503/825 or 1514/825 and some others
As long as the last three digits are 825, this is the correct set. You can find this number stamped either on the clasp or on the back of the end link.

Stamped ‘1503/825’ on clasp – match this number to confirm part fit

Stamped ‘825’ on end link – confirms compatibility with our full-size parts
Buy here: Spare Pin and Tube for Full-Sized Omega Seamaster Bracelet Link

For Mid-Sized Omega Seamaster Bracelet Links
Fits bracelets stamped:
1501/823, 1521/843, 1501/824, 1502/824 and some others
Buy here: Spare Pin and Tube for Mid-Sized Omega Seamaster Bracelet Links

If you need parts for ladies’ or Chronodiver models, contact us—we can supply them and will be adding them to the site soon.
Step-by-Step: How to Replace the Pin and Tubes
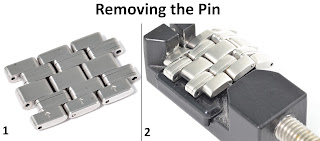
1. Find the Arrow
Look at the underside of the bracelet link. You’ll see a small arrow stamped into the metal—this shows the direction the pin should be pushed out.
2. Remove the Pin
- Place the link in the pin remover tool with the arrow pointing toward the pusher.
- Turn the handle slowly to begin pushing the pin out.
- Once part of the pin is exposed, use pliers to pull it out fully.
- Separate the link, and remove the two metal tubes from the larger holes.
Reassembling the Link (or Adding a New One)
Before continuing with the steps, refer to the image below. It’s labelled with numbers and shows the full reassembly process clearly.
Step-by-step reassembly: follow the numbered stages to insert pin and tubes correctly
Understanding the Numbered Steps in the Image Above
1 – The full set of components laid out: two link segments, the pin, and the two tubes you’ll be inserting.
2 – The new tubes are being inserted into the larger holes on either side of the link.
3 – The links are aligned and pressed together, ready to receive the pin.
4 – The pin is inserted correctly from the smaller hole, with the groove at the far end so it locks into the second tube.
5 – This shows what happens if the pin is inserted the wrong way, with the groove facing the first tube—it will not lock properly.
6 – The final result, with the pin fully seated and flush with the edge of the link.
3. Insert the New Tubes
Insert one tube into each of the two larger holes in the link.
4. Align the Links
Push the link segments together so the holes are perfectly aligned.
5. Insert the Pin
Insert the pin from the side with the smaller hole. The grooved end should be as far from the link as possible when starting. It needs to pass through the first tube before locking into the second.
6. Hammer the Pin Into Place
Use a small hammer to gently tap the pin in. Once it’s nearly flush, use the pin removal tool again to press it slightly below the surface for a clean finish.
Done – Your Seamaster Bracelet is Now Secure and Strong
This process works whether you’re:
- Removing sag or stretch from worn bracelet links
- Adding a new link for better fit
These compatible pins and tubes are easy to install and built to last, keeping your Omega Seamaster bracelet secure and solid for years to come.
Need help choosing the right part? Just contact us — we’re happy to help.
Aw, this was a really good post. Spending some time and actual effort to produce a very good article… but what can I say… I
procrastinate a whole lot and never seem to get
nearly anything done.
Thank you very much. If there is anything else you need to know just message me and I will do my best to help.
It’s an amazing piece of writing for all the web people;
they will take advantage from it I am sure.
Thank you. If there is anything I did not cover just let me know and I will do my best to help you.